Difference between revisions of "Eurodyne Tables"
(→Timing) |
(→Timing) |
||
| Line 65: | Line 65: | ||
* X axis is Air Mass per stroke | * X axis is Air Mass per stroke | ||
* Y Axis is Engine speed (RPM) | * Y Axis is Engine speed (RPM) | ||
| − | * Z axis (the field) is ignition timing | + | * Z axis (the field of cells) is ignition timing |
As with any table within Maestro, the X and Y values can be modified to suit the users needs, however the Air Mass and RPM values as set on the base files should serve 99.99% of users and are not recommended to be modified. | As with any table within Maestro, the X and Y values can be modified to suit the users needs, however the Air Mass and RPM values as set on the base files should serve 99.99% of users and are not recommended to be modified. | ||
Revision as of 03:58, 27 September 2020
Contents
Calibration tables
Limiters
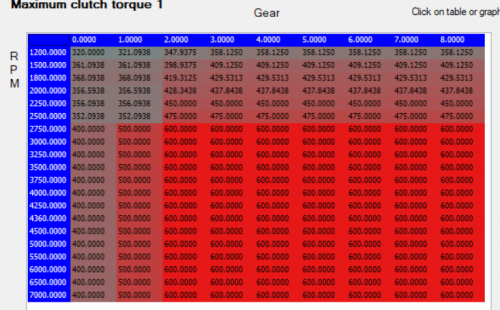
Maximum Clutch Torque
The Maximum Clutch Torque tables are used to define the maximum available torque based on RPM and gear. The two tables represent MANUAL and DSG transmissions. The ECU will look at the current Driver requested torque percentage (input from the pedal), along with the current RPM to arrive at the target torque value.
The Max torque tables can be used to limit torque delivery in certain gears.
Fueling
Basic Lambda vs Airmass DI
This table is the part throttle fueling map. The ECU will target the entered lambda values during part throttle (not pedal position). At full throttle, the ECU will switch to the "Full Load Lambda" fueling table.
Note: "Full Throttle" can happen even if the accelerator pedal is not pushed completely down.
Full Load Lambda
This table is referenced when the ECU is in a full throttle situation. The X-Axis represents time elapsed in full load in seconds.
Lambda EGT Protection
This table determines the lambda target when the ECU determines EGT (exhaust gas temperature) is too high. You may consider using targets which are not as rich if you have an aftermarket DP.
Minimum Lambda Target
This is the absolute lowest lambda value that the ECU will target. The ECU will ignore any lower values in other fueling tables.
Boost
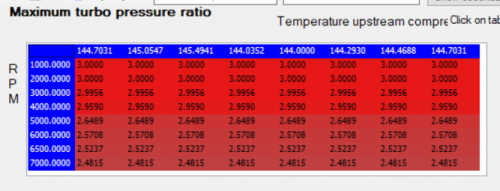
Maximum Turbo Pressure Ratio
This table is used to define the maximum turbo boost at a given RPM range. The ECU will not attempt to overshoot this boost value. Measurements are relative boost pressure *not* absolute pressure.
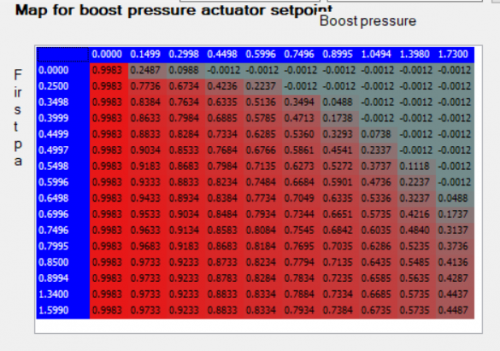
Map for boost pressure actuator setpoint
More commonly known as... wastegate duty cycle (though it's the reverse).
Factory file
The factory version of this map can loosely be translated as 'exhaust flow vs. boost'. While it's not necessarily 1:1, exhaust flow will increase along with RPM. The factory curve of the table reflects this.
Boost pressure is along the top, while the exhaust flow is along the side. An easy way to think of it is if you want to maintain the boost value in X, and the exhaust matches the flow on the Y, Z is how far opened the wastegate should be. Or - as exhaust flow increases, the wastegate should open more to account for that. Negative values will keep the wastegate closed, positive values will open the wastegate by that percentage.
This is difficult to tune for because there's no way (today) to log the exhaust flow factory (y values). There's a lot of trial and error involved. You can estimate your exhaust flow factor by finding the boost value and the boost actuator target setpoint, and then locating that cell in table.
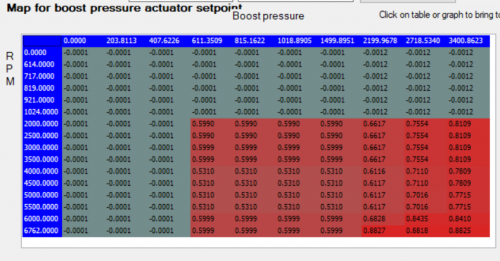
Boss/Big turbo version
The Boss file uses a different strategy that's much more straightforward. To maintain X Boost at Y RPM open the gate Z percentage.
Timing
Ignition timing is determined by two look-up tables (Ignition timing, low octane and Ignition timing, high octane) and two settings tables (Min octane for adjustable features and Min octane for adjustable features). Within the Simos18 ECU there are additional lookup tables that will impact timing that Maestro does not access. Intake Air Temperature (IAT) as recorded by the MAP sensor is one such variable that will impact your timing advance. High IATs will retard timing to reduce the likelihood of pre-ignition due to high combustion temperatures within the cylinder.
Min and Max octane for adjustable features
The two adjustable tables are preset at 87 octane and 100 octane, but these can be modified by the user. Setting the octane slider at its lowest setting will force the ECU to utilize only the Ignition timing, low octane table when determining timing. Alternatively, moving the slider to its highest setting will force the ECU to utilize only the Ignition timing, high octane table. Setting the slider anywhere in between the lowest and highest settings will allow the ECU to interpolate the timing curve based on air mass and RPM utilizing the two timing tables. Maintaining the stock values of 87 and 100 provides plenty of adjustability for the user and most would recommend leaving these values alone.
Ignition timing, low and high octane
The tables have 3 axis:
- X axis is Air Mass per stroke
- Y Axis is Engine speed (RPM)
- Z axis (the field of cells) is ignition timing
As with any table within Maestro, the X and Y values can be modified to suit the users needs, however the Air Mass and RPM values as set on the base files should serve 99.99% of users and are not recommended to be modified.
The two lookup tables serve as reference points for the ECU based on the user selected octane slider. As an example, if air mass at 3000 rpm is 600 mg/stroke and the low table shows 5.250 and the high table shows 13.875 the ECU will then look at the octane slider value and interpolate timing. Keeping the stock settings of 87 low and 100 high there are 100-87=13 different timing values that could be used. The delta between low and high for our example is 13.875-5.25=8.625. 8.625/13=0.66. For every increase in 1 above 87 on the octane slide the ECU will attempt to run approximately 0.66 degrees timing above the value in the low table. If you set the slider to 99 (12/13 available positions) then the timing will be 12*0.66=7.92 added to 5.25=13.17 (Maestro only allows values as multiples of 0.375 so in actuality the timing would be 13.125...close enough).
Setting a Timing Curve
WARNING...DO NOT ADJUST ANY OF THE TIMING VALUES IN THE COLUMNS BELOW 1000MG/STROKE. Why? Daily driving around town from stoplight to stoplight the engine uses ignition timing fairly aggressively due to the lack of airmass (which is due to the lack of exhaust volume spinning the turbine) to power the vehicle. If you lower these values the car will feel sluggish at part throttle. If you increase these values the engine will knock. Only make changes to the last few columns of the tables.
Use your datalogs to make adjustments as needed. If you are consistently seeing knock in a few cylinders at a specific RPM range then adjust the timing down at that RPM and air mass cell. It's best to make timing adjustments to both tables equally (or as equal as possible). If you are going to pull 1 degree of timing out at 6000 rpm in the 1299 air mass column then pull 0.375 from one and 0.75 from the other. If you feel like you need further reductions then pull more from the table that got the 0.375 reduction. If you only adjust one table then your octane sliders will no longer function smoothly as one end gets aggressive quickly and the other doesn't respond adequately.
How much KR is too much KR?
This question comes up quite often. The answer is whatever you are most comfortable with. Some people don't want to see any KR. Some people say anything up to -3 degrees in 2 cylinders or less at the same time is ok. Most would agree that -4 or more is not a great idea and one should remedy that. Some cars seem more prone to KR, some at specific RPM ranges that can't be removed with meth or even full E85. You might see one cylinder in particular that has more KR events than the others. Every motor is different. Use your own comfort level when setting timing.
Crackle
Unofficial changelog
Lol


